HTTP proxy basics:
When we use an HTTP proxy such as Burpsuite or ZAP or Fiddler or Charles-Proxy, we have to install the respective proxy’s certificate in the browser to intercept HTTPS connections. What we are doing is creating certificate trust between the browser and the proxy tool. Why we do it? Because, 2 SSL/TLS connections are made whenever a proxy tool has to be used, one connection between the browser and the proxy tool and the other between the proxy tool and the target server. As per PKI, for every SSL/TLS connection, a session key is generated per session for encryption and decryption between two endpoints (browser and the webserver), which in turn, is generated on the basis of a unique public key private key pair.
Note: For more info, read about the SSL/TLS handshake here:
https://www.ssl.com/article/ssl-tls-handshake-overview#ftoc-heading-2

Proxying a web application over HTTPS using Burpsuite looks as shown in the above flow. There are two key takeaways of this:
- First, when the application traffic is in Burpsuite or any proxy tool, because of the control over session key in this connection (i.e. session key-1), the proxy tool is able to decrypt application layer data to be visible in clear text i.e. the application layer data gets SSL-stripped, and with the help of proxy interception feature, it becomes possible to modify requests and responses. Hence such proxy tools are also called SSL/TLS terminating proxies.
- Secondly, the connection between Burpsuite and the target web application HTTP server is similar to what happens in a normal SSL/TLS connection between the browser and the Web application. As described in the first takeaway, since the application data gets decrypted in clear text in Burpsuite with the help of session key-1, it then uses session key-2 (generated during the SSL/TLS handshake process between Burp Suite and target web application HTTP server) to encrypt the data and the target web application HTTP server is able to decrypt it. The target Web application cannot distinguish if the traffic is coming from an actual browser or a proxy tool.
Now, that our proxy basics are clear, let’s hop on brush up some SSL or TLS digital certificate basics in the context of PKI (Public Key Infrastructure):
Digital certificates are electronic credentials issued by a trusted third party. It not only verifies the identity of the owner but also verifies that the owner owns the public key.
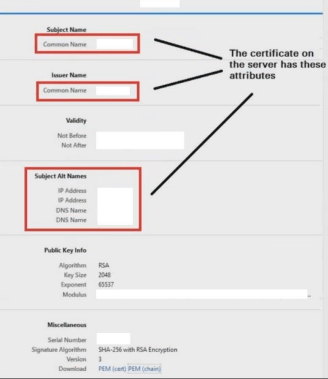
As clearly stated here, a digital certificate comprises the following fields:
- Subject: Provides the name of the computer, user, network device, or service that the CA issues the certificate to. It generally has CN or Common Name field. The subject name is commonly represented by using an X.500 or Lightweight Directory Access Protocol (LDAP) format.
- Serial Number: It is to uniquely identify a certificate for each certificate that a CA issues. This is also used in OCSP (Online Certificate Status Protocol) lookups.
- Issuer: Provides a distinguished name (DN) for the CA that issued the certificate. The issuer name is commonly represented by using an X.500 or LDAP format.
- Valid From: Provides the date and time when the certificate becomes valid.
- Valid To: Provides the date and time when the certificate is no longer considered valid.
- Public Key: Contains the public key of the key pair that is associated with the certificate.
- Signature Algorithm: The algorithm used to sign the certificate.
- Signature Value: Bit string containing the digital signature of the certificate issuer i.e. CA.
In addition to the version 1 fields, X.509 version 3 certificates include the following optional functionality and feature-based extensions to the certificate:
- Subject alternative name: A subject can be presented in many different formats. E.g., if the certificate has to include a user’s account name in the format of an LDAP distinguished name (DN), e-mail name, a user principal name (UPN), or simply IP Address or DNS Name, you can include all that or any of that in a certificate by adding a subject alternative name extension that includes these additional name formats.
- CRL distribution points (CDP): When a user, service, or computer presents a certificate, an application or service must determine whether the certificate has been revoked before its validity period has expired. The CDP extension provides one or more URLs where the application or service can retrieve the certificate revocation list (CRL) from.
- Authority Information Access (AIA): After an application or service validates a certificate, the certificate of the CA that issued the certificate — also referred to as the parent CA — must also be evaluated for revocation and validity. The AIA extension provides one or more URLs from where an application or service can retrieve the issuing CA certificate.
- Enhanced Key Usage (EKU): This attribute includes an object identifier (OID) for each application or service a certificate can be used for. Each OID is a unique sequence of numbers from a worldwide registry.
- Certificate policies: This describes what measures an organization takes to validate the identity of a certificate requestor before it issues a certificate. An OID is used to represent the validation process and can include a policy-qualified URL that fully describes the measures taken to validate the identity.
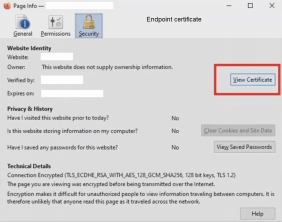
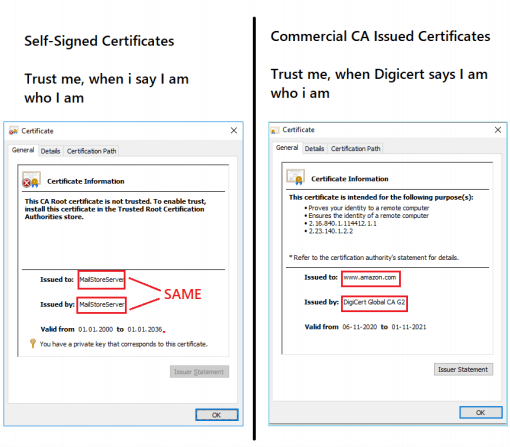
So, fields of importance in our context are Subject (Certificate owner’s name), Issuer (CA or Certificate Issuer’s name), Validity and Signature value (Digital signature of CA). PKI is based on trust or chains of trust. What I mean by that, CA or Certificate issuing Authority such as Verisign, DigiCert etc are universally known. All browsers and their OS are baked in such a way that by default, they trust certificates signed by a known CA. When we browse to a website such as google.com, the browser will verify that the certificate shown by google.com is valid and digitally signed by a known CA, and then SSL/TLS handshake process begins. This is why, when we navigate to a website that uses a self-signed certificate, the browser issues a warning stating that it doesn’t trust the certificate. This is because the issuer is not universally known to the browser. As the issuer can be any entity such as the organization itself, which is not a universally trusted third party, such certificates are known as self-signed certificates. The following side-by-side comparison perfectly sums up the difference:
Another point to be noted is that the application clients are usually shipped with their own Keystore. Keystore can be said as a container that can hold public certificates, public keys, or private keys. This is analogous to windows certificate manager, where all certificate that can be used by the OS has to be placed, so as to manage and build trust or chain of trust. The application client can use the components present in the Keystore to encrypt or decrypt the data in a secure connection or validate a public key certificate by comparing the one present in the Keystore with one presented by an endpoint.
Now that, all our basics are clear, we can understand scenarios where SSL Certificate pinning can be bypassed.
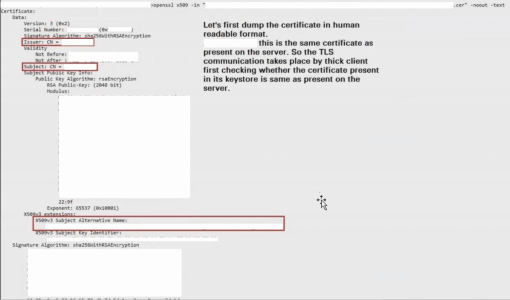
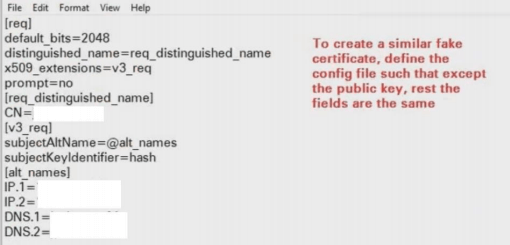
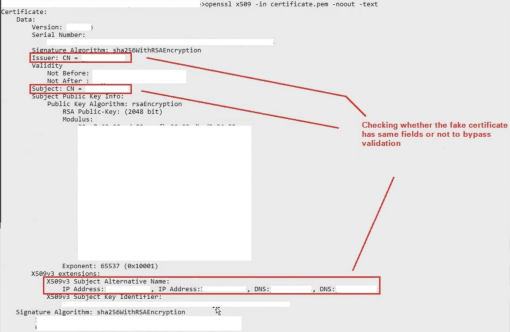
As goes true for all application-level bugs, the code level implementation on how an SSL certificate is validated matters. Many-a-times, the developers validate only either the Subject Name, Issuer Name, Validity, Subject Alternative Names or some sort of combination of these fields. These fields in the certificate can be cloned. The fields that cannot be cloned are Subject Public Key Info which has the modulus or the actual public key. This certificate cloning technique is central to the process of bypassing SSL Certificate pinning.
If an application client accepts and trusts fake self-signed certificates when connecting to an end-point, then proxy interception is possible, as validation stage where application client compares the fake certificate with the end-point certificate is passed or one can say bypassed☺. What we are basically doing is that we are inducing the application client to encrypt its data using the session key generated and exchanged between itself and the proxy tool, so the application clients think it is connecting to the endpoint, but in reality, it will be connecting to our proxy tool. This is a similar process to what we do when we import the certificate in the browser’s certificate store.
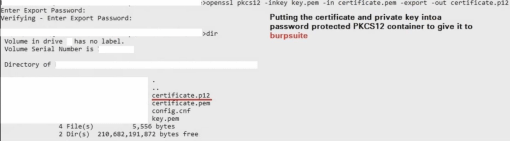
Before learning how to clone certificates, please go through this page which lays out the various formats in which a certificate file is available.
That’s the last prerequisite, seriously, we know 😉 I swear, ahead of this is only an actual demonstration where steps are explained.
During a security assessment, we came across a java based thick client communicating with its server over HTTPS. This thick client has its own Keystore. It has SSL Certificate Pinning done but implementation was improper.
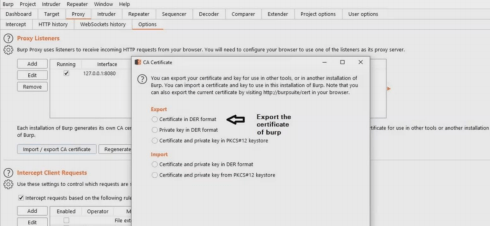
We realized this when we tried to redirect its traffic to Burpsuite by importing burp’s certificate in Keystore used by the thick client:
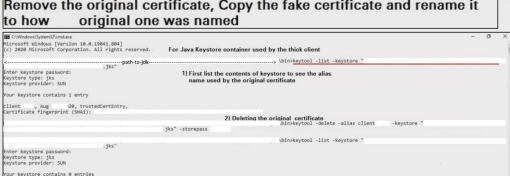
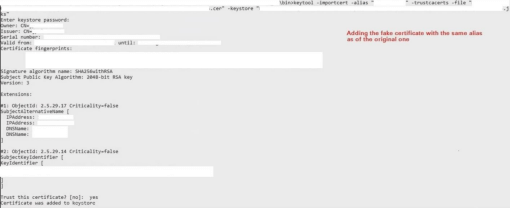
keytool –importcert –alias “any_name_you_wish_to_give” – trustcacerts –file “burp_certificate_name.cer” –keystore “name_of_the_java_keystore.jks”
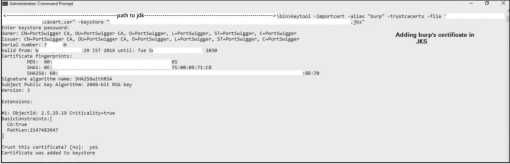
keytool –list –keystore “name_of_the_java_keystore.jks”